Mijn houtstrip viskano,
(Aangedreven door een Hobie mirage-drive)
My woodstrip fishing canoe.
(Powered by a Hobie Mirage-drive)
"Dutch/Canedian Canoecraft construction art"
Inspired by Ted Moore's canadian "Canoecraft", produced in the Netherlands.
An epoxy-woodstrip fishing canoe with a Hobie Miragedrive.
 |
| 1) Hier op de rivier de Amer bij de Amer-centrale. On the river "Amer" in the Netherlands. On the background the "Amer" powerplant. |
 |
| 2) En hier op het droge, in de tuin. And here in the garden. |
Omdat ik het kan! Ik heb al meerdere kano's gebouwd uit Ted Moore's boek, te weten de "redbird" en twee "rob roy's". Ik gebruikte deze om te gaan vissen en tochten te maken. Toen ik de Mirage drive van Hobie ontdekte heb ik besloten een epoxy-houtstrip kano ermee te ontwerpen en bouwen. Het is fantastisch om met je benen te peddelen en je handen vrij te hebben om een hengel vast te houden. Bovendien zijn je benen zóveel sterker om lange tochten te maken.
Een eigen houtstrip kano ontwerpen en bouwen is voor mij ook een ultieme uitdaging na het nabouwen van Ted Moore's kano-ontwerpen
Why spending so much effort on building a woodstrip canoe?
Because I can! I have build Ted Moore's canoes "Redbird" and two "Rob Roy's" and used them often to go fishing and touring. Then I discovered the Hobie Miragedrive and decided to build a woodstrip canoe with the mirage drive. It is great to peddle with your legs and have your hands free to hold your rod. And your legs are so much stronger for long canoe trips!
Designing and building my own canoe is the ultimate challange after building Ted Moore's canoes.
Voordat ik de kano gemaakt heb, natuurlijk eerst de Hobie kano's geprobeerd, de Hobie Outback een keer gehuurd bij de importeur in Stellendam en de Hobie PA12 van een vriend een keer geprobeerd
En de houtstrip methode, ontwerpregels, vormen en eigenschappen opgefrist uit Ted Moore's canoecraft boek.
Before I designed and build, of cource, I have studied and experienced the Hobie canoe's with the mirage drive, the Hobie outback and the Hobie pro-angler.
The knowledge for the woodstrip methode and designs only needed a fresh-up. I can dream the canoe designrules and shapes and habbits from Ted's canoecraft manual :-)
 |
| 3) Hier probeer ik de Hobie Pro Angler 12 uit. Here the try-out of the Hobie Pro Angler 12. |
Het uitgangspunt, de voor mij meest essentiële onderdelen: Een mirage-drive en een vis stoel waar ik lang, comfortabel in kan zitten. De rest kunnen we beschouwen als een uitbreiding daaromheen, toch?
The starting poUpdate: After a few years the PVC rudder is broken. It does not surprise me, because I have spend many hours in rough conditions where the rudder has been jammed in the mud several times. I have replaced it with an 6mm aluminium rudder. int, the most essential parts for me : A mirage drive and a fishing chair in wich I can sit confortable for long day's . The canoe hull can be seen as an extension around it, right? (just joking, Ted)
 |
| 4a) Stoel en Mirage Drive. Chair and Mirage Drive. |
 |
| 4b) De mirage drive. Door op de pedalen te duwen bewegen ze voor- en achterwaarts waardoor de rubber flippers naar links en rechts bewegen zoals pinguin vinnen. Dat geeft de voorwaartse kracht. The mirage-drive. By pushing the pedals for- and afterwards with your legs, the rubber flippers will move from left to right in the water, likes penguin fins. This gives the forward power. |
De Methode
De methode van bouwen is de houtstrip-methode. Dunne houten strips van ongeveer 6x18 mm worden over een mal gebogen en gelijmd. De mal (die ondersteboven op een draagraam staat!) bepaalt de uiteindelijke vorm van de kano. Als de houten romp van de kano op de mal klaar is , dan gaat er glasvezel en epoxy overheen. Dan kan de romp van de mal af en kan de binnenkant ook van glas/epoxy en interieur voorzien worden. Voor kleuraccenten en sterkte heb ik verschillende houtsoorten gebruikt, met name red ceder en vuren voor de romp, en blank eiken voor de stootgevoelige plekken zoals de randen.The method
The method of building is the wood-strip method. Thin strips of wood, sized about 6x18 mm, bent over a mold and glued together. The mold (standing upside down on a supporting frame) defines the final shape of the canoe. When the hull of the canoe -on the mold- is ready, the hull is covered with fiberglass and epoxy. Then the hull can be removed from the mold and turned around. Then the hull's inside can also be covered with fiberglass and epoxy. For color accents and strength I have used different types of wood, especially red cedar, pine for the hull, and white oak for the shock- and impact sensitive areas such as the edges and gunwales. |
| 5) Hier de mal. The Mold. |
Het ontwerp
De Hobie viskano's zijn van plastic gemaakt. Eigenlijk zijn het gewoon grote plastic PET flessen.Dat is bijzonder goed in een vorm te persen, het is stootvast en robuust. Maar ook een beetje lomp.
Met hout kun je echter niet ongelimiteerd vormen maken zoals met plastic. Er moet dus een ontwerp komen waarin de eigenschappen voor een m.i. goede viskano naar voren komen, binnen de mogelijkheden van de houtstrip methode. Ontwerp uitgangspunten en overwegingen zijn geweest:
- Omvang en gewicht, ongeveer 4 meter lang, rond de 95 cm breed en 35 cm hoog, gewicht ongeveer 35 kg kaal.
- Vorm: rechte voorpunt, neutrale spiegel (net boven de waterspiegel), vrij vlakke bodem in het midden i.v.m. stabiliteit, licht naar binnen gebogen zijkanten en licht naar voren omhoog gebogen dek. Veel rondingen dus. Het is ook een "haar", geen "hem".
- Redelijk stabiel, ongeveer tussen de hobie outback en de PA12 in. Ik wil me vrij kunnen bewegen in de kano zonder grote kans op omslaan als ik een grote vis binnenhaal :-)
- Roer, met één hand te bedienen met een roer-handel. Het roer kan opgetrokken worden in de onderkant van de kano en dus in/uitklapbaar zoals bij de hobie kano's (maar iets groter roer dan het standaard hobie roer)
- Redelijk stabiel rechtdoor varen, maar toch responsief op het roer. Daarom een gemiddelde buiging in de lengte van de bodem (rocker), maar ook een (beperkte) kiel en kiel-lat. De kiel en kiel-lat zorgen ook voor sterkte en stootvastheid. De kleine kiel draagt ook het inklapbare roer.
- Voldoende ruimte in de kuip voor stoel en spullen, maar ook afgesloten ruimtes voor materiaal en drijfvermogen. In principe moet de kano om kunnen slaan en terug te keren zijn zonder direct helemaal vol met water te staan. Een volkomen sit-on-top is geen noodzaak. Mocht er wat water in de kuip komen dan is het gemakkelijk leeg te scheppen.
Ik heb geen kant-en-klaar houtstrip kayak-ontwerp kunnen vinden voor toepassing met een mirage-drive. Het bestaat denk ik nog niet. Er zijn wel bestaande kano's omgebouwd voor de mirage-drive, maar er zijn geen specifiek op vissen gerichte ontwerpen (en dus zonder roer!). Dit is dus de eerste! Dat is een behoorlijke uitdaging voor mij geweest, je weet immers nooit helemaal zeker of het resultaat helemaal aan je wensen en verwachtingen voldoet.
Kennis over de vorm, eigenschappen en mogelijkheden van houtstrip-kano's had ik al door eerdere kano's die ik gebouwd heb uit het kanobouw boek van Ted Moore.The design
The Hobie canoes are produced from plastic. Actually it are huge plastic PET bottles. A plastic canoe is excelent shapeable, have big impact resistance and are robust and maintenance-free. But a bit limp too.With woodstrips, you can not create unlimited shapes like with plastic. There must be a design in which the characteristics of a good fishing canoe come forward, within the shaping possibilities of the wood strip method. Considerations for the design have been:
- Size and weight: against
- Shape: plumb bow, neutral mirror (just above the waterline), fairly flat shallow arch bottom on the waterline width because of stability.
- Tumblehome wals. All lines are curved. So it is a "her", not a "him".
- Reasonably stable. I want to move myself freely without a big chance to keel over, (catching a big fish :-)
- Rudder -handle - one hand-operated-, rudder can sunk into the canoe rudder-cabinet with a rope.
- Reasonably straight-on stability, but still responsive to the rudder. Therefore moderate rocker.
- Plenty of room in the cockpit for seat and stuff, but also compartements for keeping equipment and supplies. - In principle, the canoe must be able to keel over and get back without flooding the compartments . A Hobie-alike "sit-on-top" is not a necessity. If there is water coming into the cockpit it must be easy to empty it.
I have not found a ready-to-build design for such a woodstrip-canoe. It think it still does not exist. There are some examples of existing canoe's converted for the mirage drive (without rudder!), but there are no fishing-canoe designs. So this is the first! and that has been a challenge for me, you never know exactly whether the results meet your requirements and expectation.
I have gathered the knowledge about the shape, characteristics and potentials of wood strip canoe's with earlier canoes that I have built from Ted Moore's "Canoecraft".
 |
| 6) Mijn leidraad voor dit avontuur is het boek "Canoecraft" van Ted Moores. My guide for this adventure is the book "CanoeCraft" by Ted Moores. |
  |
| 7) De eerder gebouwde "Rob Roy" kano's uit het canoecraft boek. The earlier build "Rob Roy" canoes from the canoecraft book. |
Uiteindelijk staat het kano ontwerp op een paar stukken papier. De vorm van de schotten, en de maten van de kuip, tussenschotten, miragedrive en roerkast. That's it!
Filosofie: Meer is minder. De kano is in de basis zo uitgekleed mogelijk Alle onderdelen moeten te ontkoppelen (en los te vervoeren) zijn, alle plekjes bereikbaar voor inspectie en onderhoud.
Ultimately, the design for the fishing-kanoe on a few pieces of paper. The shape of the partitions of the mal, and the dimensions of the cockpit, partitions, mirage drive and rudder box. That's it!
Philosophy: More is less. The Canoe is not dressed up in the base. All parts must be able to decouple (and seperately transported). All locations in the canoe must be accessible for inspection and maintenance.
 |
| 8) Het bouwplan The designpapers |
De Matrialen
The materials
 |
| Behalve de diverse soorten houten latten en plankjes is er glasvezelmat, epoxy, DD-lak, mengbekers, kwasten, rollers, squeegee en niet te vergeten: veiligheidsmateriaal (veiligheidsbril, stofmasker, handschoenen etc.) nodig. En soms een goed advies . . . Ik vertrouw daarvoor al vanaf mijn eerste kano op "de bootbouwer". Besides the several wooden battens en boards jou need the fiberglass cloth, epoxy, mixing cubs, brushes and rollers, squeegee en don't forget: the safety materials (safety glasses, dust mask, gloves, etc). And sometimes a good advice . . . Therefore I trust on "de bootbouwer"' up from my first canoe. |
de BOOTBOUWER.
Middendrift 10
9307 TB Steenbergen(Dr.)
tel. : 050-507 34 30
http://www.bootbouwer.nl/
En op Polyestershoppen.nl, waar ik de epoxy heb aangeschaft voor modificatie en onderhoud van de kano (2022)
Polyestershoppen support@polyestershoppen.nl
Polyestershoppen +31 (0)85 022 00 90
Polyestershoppen +31 (0)85 130 59 32
De bouw van de romp
Building the hull
 |
| 9) Vanaf de onderkant van de mal worden de latten een voor een omhoog op elkaar gelijmd en tegen de mal aan geklemd. In de punt zit een gebogen lat (de binnen-"stem") waar de romp-latjes tegenaan gelijmd worden. From the bottom of the mold up, the woodstrips are glued together, one by one and clamped to the mold. The bow is a curved bar (the inner stem), the hull strips are glued and clamped against it. |
 |
| 10) Halverwege de mal, met de kleur accenten van de houten latjes. Iedere avond aan iedere kant één latje, een week of drie lang :-) Halfway through the mold, with the color accents of the woodstrips. Every night óne woodstrip on each wall side , three weeks long :-) |
 |
| 11) Als de latje veel getordeerd moeten worden ten gevolge van de vorm, dan zijn er veel klemmen nodig! If the woodstrips has to be twisted a lot, due to the hull's shape, a lot of clamps are required! |
 |
| 12) Kwestie van geduld en kracht uitoefenen met latjes buigen en inpassen, en de romp is dicht. De doorvoer voor de miragedrive is in blank eikenhout uitgevoerd. Matter of patience and exercise for bending and fitting, and the hull is closed. The passage for the mirage drive is curved from strong white oak wood. |
Glasvezeldoek en epoxy, Fiberglass and Epoxy
 |
13) Er gaat één grote lap glasvezeldoek over de geschaafde en geschuurde romp.
One large piece of fiberglass cloth fits over the scuffed and sanded hull. |
Daarna drie lagen epoxy eroverheen (dat is een lastig en beetje vies en uitdagend klusje)
Then three coats of epoxy to cover the fiberglass cloth. (which is a bit dirty and challenging job)
 |
| 14) Kiel erop, deze krijgt ook een aluminium strip als beschermende stootrand. Keel added, the keel gets an aluminum strip as protecting bumper |
 |
| 15) Buitenstem, overgaand in een beperkte kiel/lat erop, met een aluminium stootrand. Outer stem -embracing into the keel-strip- added, also with an aluminium stip for protection. |
De binnen- en bovenkant van de kano
The inside and top of the canoe
 |
| 16) De kano is nu van de mal af en omgedraaid. Uiteraard de binnenkant ook weer schaven en schuren. Zoals je kan zien blijven er drie schotten van de mal staan. Daar is de romp aan vastgelijmd, het worden later de compartimenten. The canoe is now off the mold and turned around. Of course, the inside needs planing and sanding too. As you can see three segments of the mold remains. The hull is glued to them, they will become the compartiments later on. |
 |
| 18) Detail van de kast voor de mirage-drive. Detail of the construction for the mirage drive. |
 |
| 17) De kale romp is nog niet stevig zonder stootranden. The hull is not yet strong without the gunwales. |
De binnenkant is nu ook afgewerkt met glasvezel en epoxy.
The inside is now covered with fiberglass and epoxy.
 |
| 19) De stootranden ofwel dolboorden. Deze zijn van keihard blank eikenhout. The gunwales are attached. They are from very hard white oak. |
 |
| 20) Het dek en de afwerking van de mirage-drive kast (daar zitten opbergvakjes naast). The deck and the construction for the mirage drive enclosure with integrated storage boxes. |
 |
| 21) Het roer is inklapbaar, en valt weg in de roerkast als het ingetrokken is. Het kleine kieltje draagt de draaiende as van het inklapbare roer The rudder is foldable, and fits in the rudder cabinet when folded. The small keel carries the revolving axis for the rudder. |
 22) Zij aanzicht van de kano met uitgeklapt roer. Starboard view with unfolded rudder.  |
| 23) Bovenaanzicht. Rechtsboven naast de stoel zie je de rode lijn waar het roer mee omhoog getrokken kan worden, de roerkast in. Links de stuurhendel. Top view. Top right you can see the red rope by wich the rodder can be pulled up into the rudder cabinet. At the left side the steering handle. |
 |
| 24) Details van het roer mechanisme. Alle onderdelen zijn demontabel met een boutje en elastieken. Details of the rudder mechanism. All rudder-parts are demountable with a bolt and elastics. |
 | ||
| 25) Deksels op de opbergvakken. De deksels zijn licht gebogen. De eivorm maakt ze super sterk! De deksels zitten met elastiek naar binnen toe vastgehaakt, ze zijn naar voor/achter te schuiven om in de compartimenten te kunnen komen. De stuur-handel en touwen zijn hier te zien, midden bakboord . Covers on the storage compartments. The covers are slightly bent. The egg shape makes them super strong! The covers are hooked inwardly with elastics , the covers are slidable to reach the inside of the compartments. The ruddle- handel with ropes are visible, middle larboard.  26) Details van de bevestiging voor de Mirage drive. Er zijn twee opbergvakken met dekseltjes links en rechts ervan. Een los open frame wordt over de mirage-drive geplaatst om opklotsend water tegen te houden en met een bakje en rekje voor klein vis-matriaal zoals kunstaas en een tangetje. Detail of the mirage drive and storage compartments. There are two compartments with covers left and right of de mirage-drive. A seperate open frame is placed over the mirage-drive to stop plashy water and provide a small bin and rack for small fishing attributes like lures and a pincer.
|

The proof of the pudding is the eating.
 |
| 27) Op de Amer richting Biesbosch, al vissend. Heerlijk, die handen vrij om je hengel vast te houden! Dit is ultiem vis-genot. Fishing on the river 'Amer' in the direction Biesbosch. One hand for steering, one hand for the rod. This is ultimate fishing delight! |
Varen met - en vissen vanuit een kano is Ultieme ontspanning, vrijheid en beweging.
Sailing - and fishing with a canoe is ultimate relaxation, freedom and exercise.
 |
| 28) Trollend over het talud. Trolling over the underwater slopes. |
 |
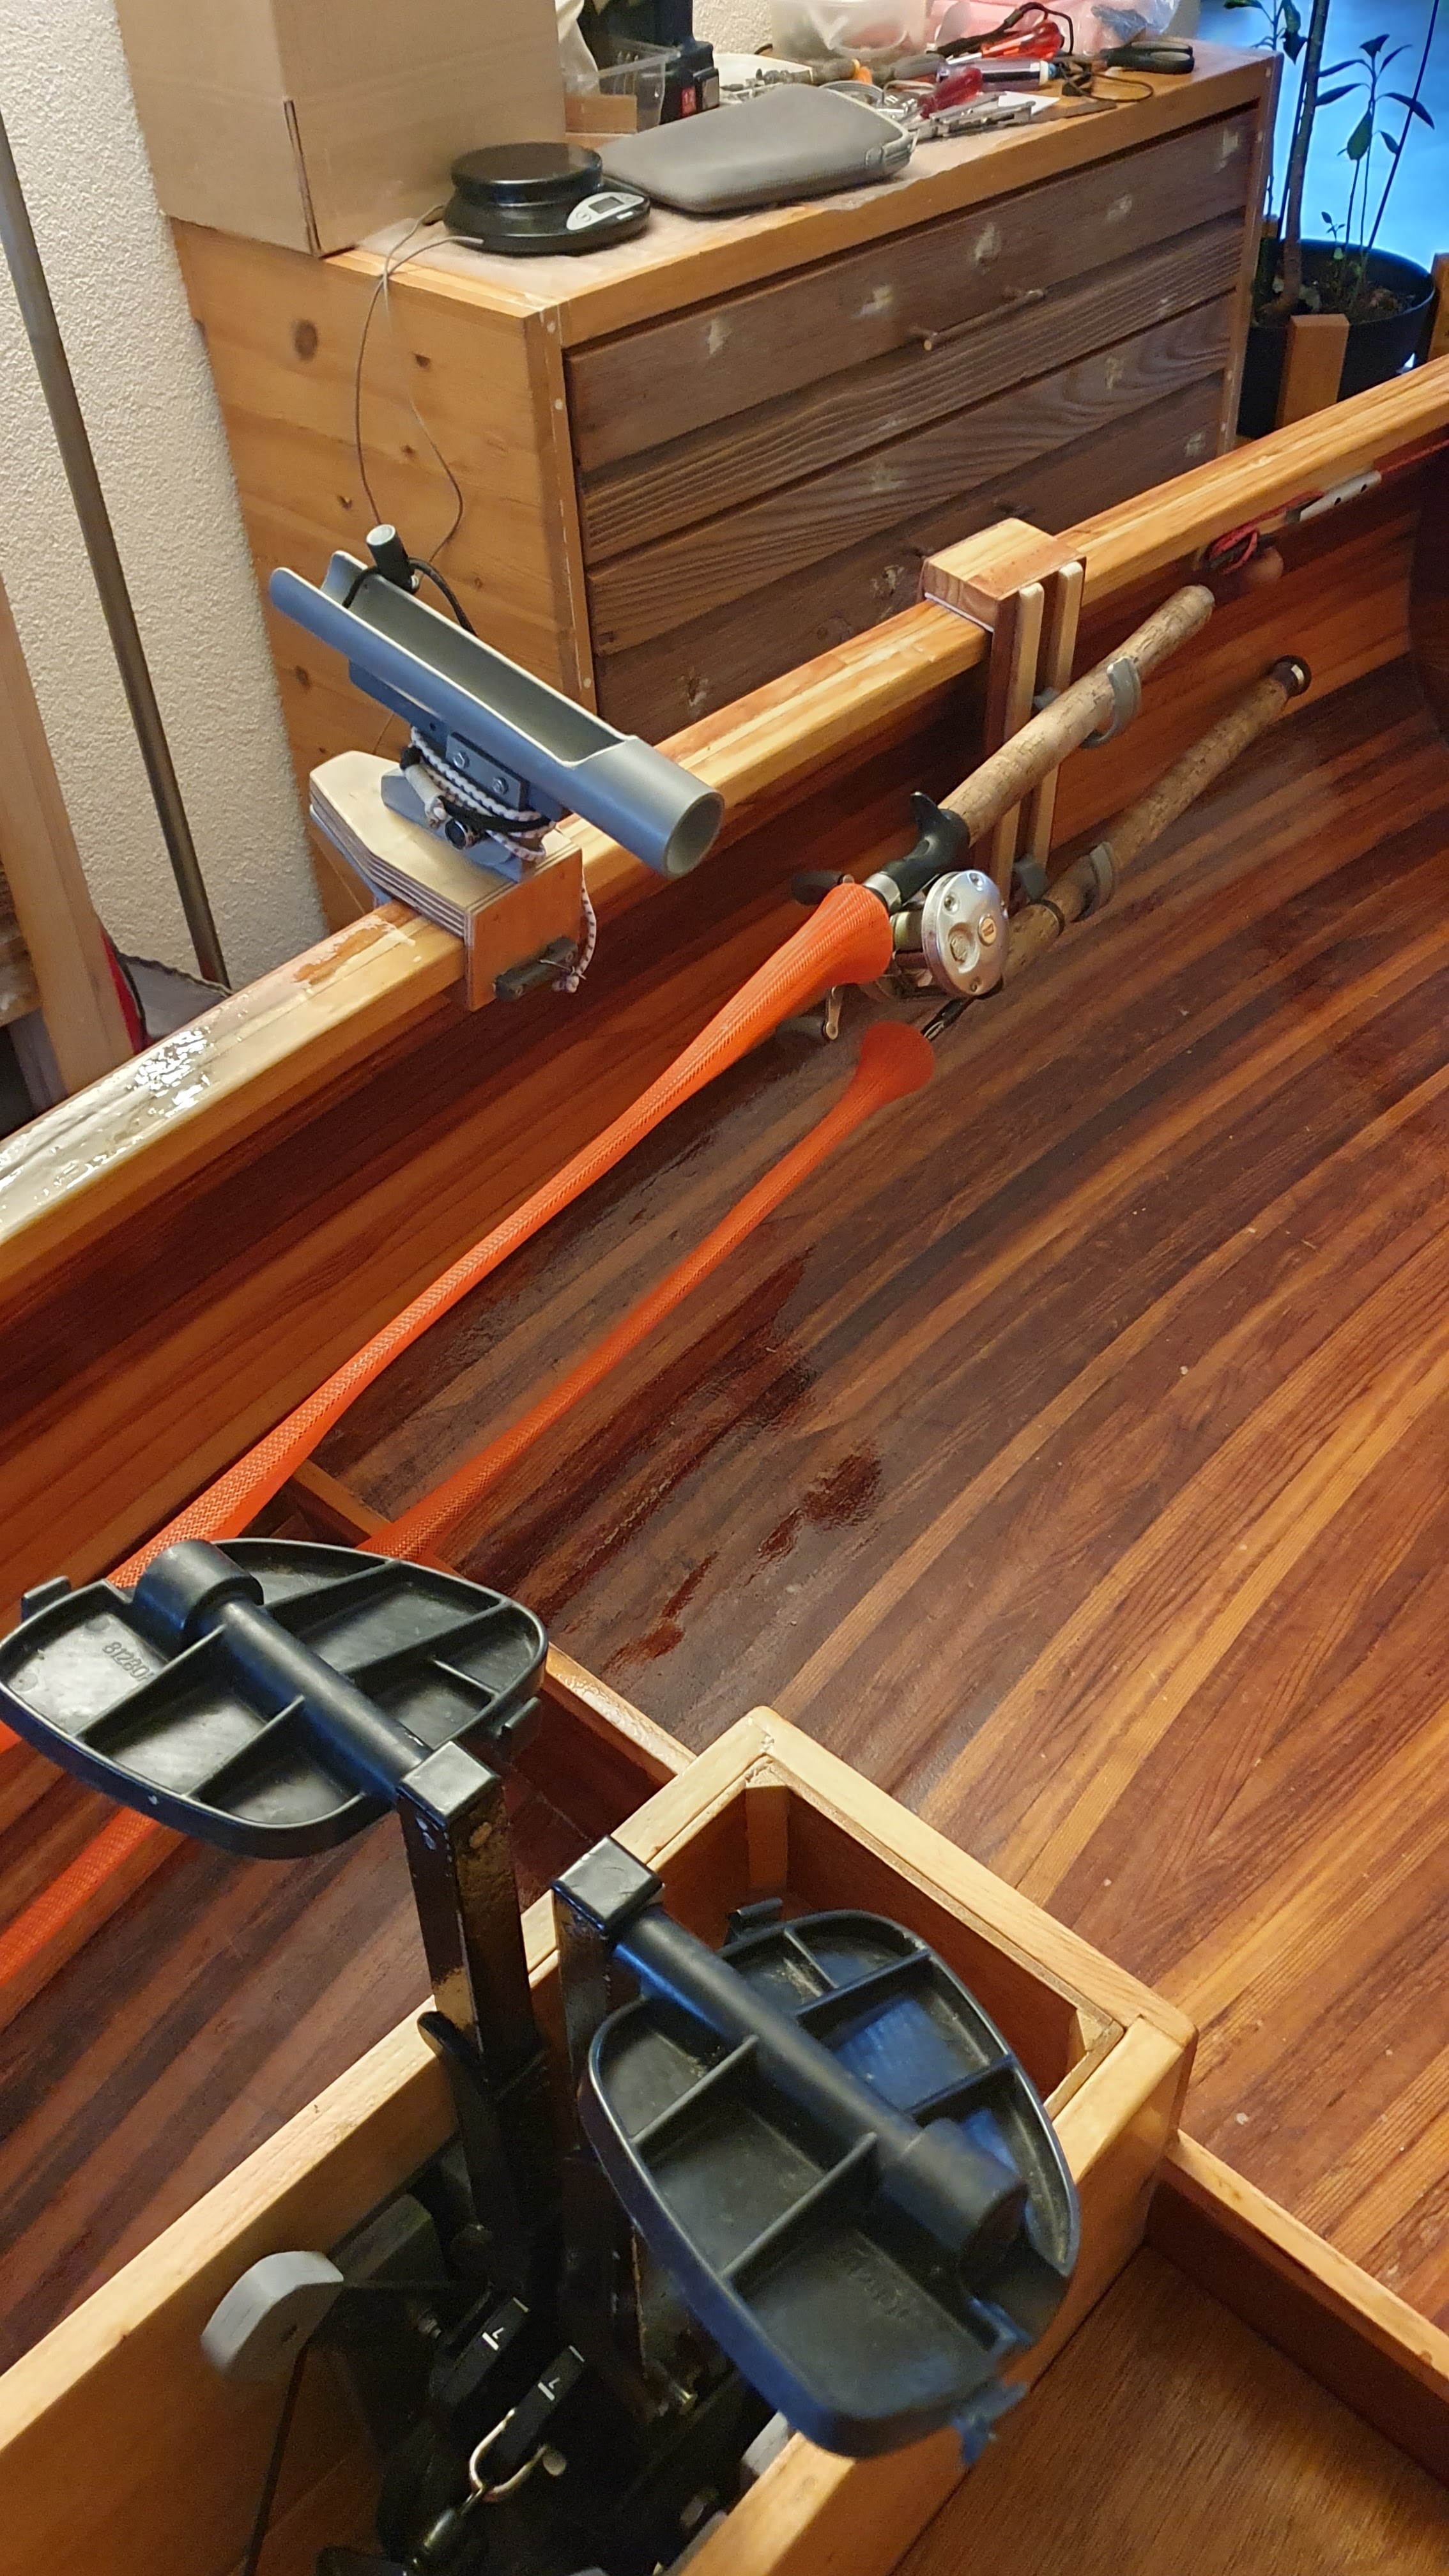
| 29a) Gebroederlijk tezamen met de Hobie PA12. Het is een mooi koppel. De hengelsteun kan ik los op de rand van de kano klemmen op iedere gewenste plek. Fraternally together with the Hobie PA12. It's a lovely couple. The rod support can be clamped on the gunwales at any location. |
 |
| 29b) Hengelsteun op de rand Rod holder on the gunwale. |
 |
30) Op zaterdag 9 november 2013, op het Wantij wezen vissen.
Deze snoekbaars van ongeveer 70 cm kon het kunstaas niet weerstaan.
Saturday, November 9th 2013 fishing on the river 'Wantij' . The 70 cm bass couldn´t resist the lure. |
 |
| 31) En zo kwam hij van zolder af de tuin in, "abseilend". At a rope, trough the window from the 2th floor to the garden. |
 |
| 32) Vervoer op de auto. Goed te zien dat het roer ingeklapt is. Transportation by car. View on the folded rudder. |
 |
| 33) Zij aanzicht met stoel en mirage-drive Sideview with chair and mirage-drive |
 |
| 34) Zeilen gaat ook prima. Op foto 26 zie je de bevestiging voor de mast Sailing goes very well too. Op picture 26 you can see the construction for the mast |
 |
| 35) Voor betere zeil eigenschappen kan de mirage-drive vervangen worden door een draaibare kiel. De kiel draait in een kastje dat in plaats van de mirage-drive in de kano geplaatst kan worden. For better sailing proporties; a rotatable keel. The keel fits in a cabinet, the kabinet fits in the hull, repacing the mirage-drive. 
36) De laatste uitbreiding: Een kleine Lowrange Elite-4x fish-finder. De lood-gel accu zit in het kastje dat aan de stootrand hangt. De transducer steekt vlak naast de kano in het water.
The latest extension; A small Lowrange Elite-4x fish-finder. The lead-gel battery fits in the small cabinet wich hangs on the gunwale. The trancducer enters the water bisides the hull.
  The fish-finder aside the canoe. |
 |
| 38) Dagje oostvoornse meer A day at 'oostvoornse meer' in the Netherlands |
 |
| 39) Het ritselt er van de bot in het zoute water. . Salt water, containing a large amount of flounder |
 | |
| 40) Ik heb een extra randje om de mirage-drive kast gezet. Er loopt nu geen water meer de kano in als ik op de voorpunt ga zitten. |
I have added a small shelf arounf the mirage-drive box. Now no water is entering the canoe anymore when I move meself to the front of the canoe.
 | |||
| 41) In het linker opberg-kastje heb ik een uitneembaar bakje gemaakt om matriaal op te bergen. |
An box is added in the left compartment to store small materials.
Het ontwerpen en bouwen van je eigen vis-kano is een mooie uitdaging en kan een fantastisch resultaat geven. Het komt helemaal uit je eigen handen. Voorbereiding is cruciaal, maar iedereen kan het. Met behulp van de instructies van Ted Moore in zijn boek "canoecraft" kun jij dat ook.
Designing and building your own fishing canoe is a great challenge and can give beatyfull results. It comes completely out of your own hands. Preparation is key, but anyone can do it, using the instructions from Ted Moore in his book "canoecraft" .
--------------------------------------------------------------------------
If you have any question or comment, please let me know via the "comment" on the bottom of this page. I will update this blog with Q&A if questions arise.
Groeten (Regards), Ben
-----------------------------------------------------------------------------------------
Update december 2022
Na bijna 10 jaren gebruik van de kano heb ik modificaties aangebracht:
- De trapkast, waar de mirage drive in zit ging lekken op een plek waar ik niet meer bij kon komen. De hele kast is vervangen door een simpelere kast waar ik goed overal bij kan komen. Het slot voor de mirage drive is een kliksysteem geworden, was een draaisysteem
- De kano was wel wat zwaar, en ik liet altijd alle deksels openstaan om bij mn spullen te kunnen. De kano was ook iets te hoog. Het hele bovendek er dus maar vanaf gezaagd. Less is more.
- De kano was 4 meter lang en had vrij veel rocker, dat is de kromming in de lengte, het kontje kwam altijd boven water en was ook erg robuust. 20 cm eraf gezaagd dus maar en vervangen door een dun plaatje red cedar en een handgreep
- Ik miste een goede handgreep achter voor vervoer en tillen. Zie punt 3
- De roerkast was te lang, ik had een groot roerblad ontworpen maar bleek helemaal niet nodig en ook onhandig. Inkorten dus, zie punt 3
- Ik kon mn hengels niet goed kwijt in de boot, b.v. bij varen onder een brug of onder bomen. Twee gaten in het voor-schot zullen dat gaan oplossen, ik kan m'n hengels nu in de boot horizontaal opbergen.
- De transducer hing altijd naast de kano aan een kastje met de accu en het scherm. Dat gaf weerstand en ving wier. Ik heb een extra gat in de bodem gemaakt in de trapkast waar de transducer precies in past en precies in het water hangt, en niet onder de kano uit steekt.
Zie hier een foto impressie van het resultaat.


Q&A
Q: Do you have the detailed plan for the segments of the mold?
A: Not yet. Takes a lot of time which I rather spend on the water :-). I will update this blog when I have more detailed plans and sizes. Typically a winter evenings job.Q: Are the detailed plans and sizes critical?
A: Yes and No. The sizes and shapes defines you canoe's behaviour (and the aesthetics) . But when you have rough plans and sizes for a proven type of canoe -for example this fishing-canoe with a mirage drive- then it will do, and you can play a little bit with it. It is realy not milimeter critical. Important is where to locate the chair and the mirage drive (the distance between them, and the possibity to tune it to your body sizes) in a way that your weight is centered in the canoe, and your legs does not overstretch.Q: What materials did you use for the rudder?
A: Leavings. An hollow aluminium pipe from a kitchen cabinet and an old 5 mm Aluminium plate. I have tried an wooden and a PVC rudder, but then the floating force is too big to hold the wooden rudder in the unfolded position. The PVC rudder was not strong enough. The Aluminium rudder works perfect already for years now.And I have added an nylon roller bearing to support the rudder rod.
Q: How long does it take to build the canoe?
A: One winter, many evenings a little bit of time (1-2 hours) and one weekend for the epoxy (it is very time consuming- and critical to add the three epoxy layers and get a chemical bounding).Q: What is most difficult in the building process?
A: My experience is that the fiberglass-epoxy coating is the most challenging. If you scew-up some wooden strips or plates it can be removed and redone, but the epoxy must be applied adequate in one time, no second chance. Be sure to get good materials: The fiberglass rolled on a rol, NOT folded (the folds will refuge to stay tight to the hull). Marine epoxy, I use poly-pox. The epoxy is finished with special transparant UV-resistant DD paint (polypox too). Read Ted Moore's book to learn the detailes! Take care!! Use goggles, latex gloves and old clothes when you work with epoxy, and work in a ventilated location.
Q: Do you use epoxy to glue the woodstrips too?
A: No, I do not like to glue with two-components epoxy. It is time-critical (the epoxy will cure in the pot if you work too slow), epoxy is not easy to apply on the small woodstrips, and epoxy is more difficult to sand down the hull.I use one-component polyurethane glue. Polyurethane is easy to apply (directly from the bottle to the woodstip) and easy to sand down, and the glue expands when curing, so it fills all space between the woodstrips. The colour of cured polyurethane is wood-alike . . . Probably epoxy is stronger, but polyurethane is very strong too and more then strong enough!

Q: How does the canoe behave in rough flowing water?
A: Very controllable, I think this bahaviour is due to the combination of moderate rocker versus the mirage drive flippers and big rudder. The rough water has more grip on the rudder and flippers then on the canoe's hull. With some speed, the canoe turns very fast, and when drifting (no forward speed) it is easy to keep the canoe in position just by turning the rodder and change the flipper position.
Comment or question?? Enter under 'comment' button.
